
In this tutorial we will write a simple Java project to demonstrate Hibernate one to Many Mapping using XML mapping. We will first create a Java project using Maven and then will add Hibernate on it. If you have any questions, please post it in the comments section. If you are interested in receiving the future articles on Java topics, please subscribe here. If you are beginner for hibernate, please read the articles about introduction to hibernate, interceptors in hibernate and spring & hibernate integration. We also recommend good reference books for learning hibernate in our post about hibernate books.
- [download id=”13″]
 .
.
One To Many Relationship
Also known as a many-to-one relationship, this occurs when the maximum of one multiplicity is one and the other is greater than one. An example is the relationship between Person and Phone. Consider the following relationship:
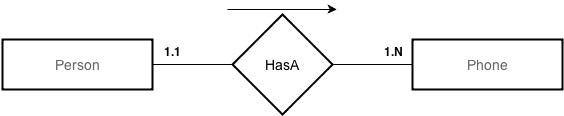
According to the relationship each Person can have a any number of phone numbers. But each phone number will be associated with only one person. Hence we will need two tables namely PERSON and PHONE to create this relation. In Hibernate, one-to-many relationship between entities can be created by 2 different techniques. These techniques are:
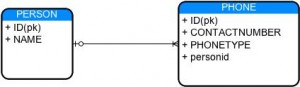
- Using foreign key association: In this association, we can have a foreign key column in PHONE table i.i PERSONID. This column will refer to primary key of PERSON table. This way no two phone numbers can be associated with multiple persons. Obviously, phone number needs to be unique for enforcing this restriction. The example below in this post demonstrates this association. The relational model is shown below:
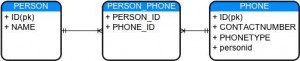
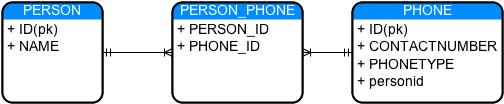
- Using a common join table: In this association, we can have a common join table lets say PERSON_PHONE. This table will have two column i.e. PERSON_ID which will be foreign key referring to primary key in PERSON table and similarly PHONE_ID which will be foreign key referring to primary key of PHONE table. The relational model is shown below:

Technologies Used:
Following are the tools and technologies required for this project:
- Java JDK 5 or above
- Eclipse IDE 3.2 or above
- Maven 3.0 or above
- Hibernate 3.0 or above (Hibernate Downloads)
- MySQL 5 above (MySql Downloads)
1.Environment Setup
Refer post Hibernate, Maven and HSQL – Example Project (XML Mapping) for environment setup (follow steps 1,2 and 3). Pass the following command in the step.1, to create a java project using Maven:
mvn archetype:generate
-DgroupId=net.javabeat.hibernate
-DartifactId=HibernateOneToManyXML
-DarchetypeArtifactId=maven-archetype-quickstart
-DinteractiveMode=false
2. Adding dependencies to pom.xml
We need to add the Hibernate, MYSQL and some other dependencies to the Maven pom.xml as shown below:
 <project xmlns="http://maven.apache.org/POM/4.0.0" xmlns:xsi="http://www.w3.org/2001/XMLSchema-instance"
   xsi:schemaLocation="http://maven.apache.org/POM/4.0.0 http://maven.apache.org/maven-v4_0_0.xsd">
   <modelVersion>4.0.0</modelVersion>
   <groupId>net.javabeat.hibernate</groupId>
   <artifactId>HibernateOneToManyXML</artifactId>
   <packaging>jar</packaging>
   <version>1.0-SNAPSHOT</version>
   <name>HibernateOneToManyXML</name>
   <url>http://maven.apache.org</url>
   <dependencies>
     <!-- Hibernate library dependency start -->
 		<dependency>
 			<groupId>org.hibernate</groupId>
 			<artifactId>hibernate</artifactId>
 			<version>4.1.9.Final</version>
 		</dependency>

 		<dependency>
 			<groupId>mysql</groupId>
 			<artifactId>mysql-connector-java</artifactId>
 			<version>5.1.10</version>
 		</dependency>
 		<dependency>
 			<groupId>org.hibernate</groupId>
 			<artifactId>hibernate-annotations</artifactId>
 			<version>3.3.1.GA</version>
 		</dependency>
 		<dependency>
 			<groupId>dom4j</groupId>
 			<artifactId>dom4j</artifactId>
 			<version>1.6.1</version>
 		</dependency>
 		<dependency>
 			<groupId>commons-logging</groupId>
 			<artifactId>commons-logging</artifactId>
 			<version>1.1.1</version>
 		</dependency>
 		<dependency>
 			<groupId>commons-collections</groupId>
 			<artifactId>commons-collections</artifactId>
 			<version>3.2.1</version>
 		</dependency>
 		<dependency>
 			<groupId>cglib</groupId>
 			<artifactId>cglib</artifactId>
 			<version>2.2</version>
 		</dependency>
 		<dependency>
 			<groupId>asm</groupId>
 			<artifactId>asm</artifactId>
 			<version>4.0</version>
 		</dependency>
 		<dependency>
 			<groupId>dom4j</groupId>
 			<artifactId>dom4j</artifactId>
 			<version>1.6.1</version>
 		</dependency>
 		<dependency>
 			<groupId>ehcache</groupId>
 			<artifactId>ehcache</artifactId>
 			<version>1.2.3</version>
 		</dependency>
 		<dependency>
 			<groupId>hibernate-tools</groupId>
 			<artifactId>hibernate-tools</artifactId>
 			<version>3.2.3.GA</version>
 		</dependency>
 		<dependency>
 			<groupId>jta</groupId>
 			<artifactId>jta</artifactId>
 			<version>1.1</version>
 		</dependency>
 		<dependency>
 			<groupId>log4j</groupId>
 			<artifactId>log4j</artifactId>
 			<version>1.2.11</version>
 		</dependency>
 		<dependency>
 			<groupId>oscache</groupId>
 			<artifactId>oscache</artifactId>
 			<version>2.1</version>
 		</dependency>
 		<dependency>
 			<groupId>persistence-api</groupId>
 			<artifactId>persistence-api</artifactId>
 			<version>1.0</version>
 		</dependency>
 		<!-- Hibernate library dependecy end -->
   </dependencies>
 </project>
As a next step, let’s execute the following command so that maven will download all the required JARs and add the same to eclipse classpath. The command line point to the directory C:\HibernateProject\HibernateOneToManyXML and execute the following command:
mvn eclipse:eclipse
3. Create Model Classes and hibernate mapping files
Next let’s write Hibernate XML Mapping files to the directory: /src/main/resources . Create the resources directory as follows: Right click on Project > New > Source Folder > Give folder name “/src/main/resources/” and click Finish. Write the file src\main\resources\net\javabeat\hibernate\Person.hbm.xml for the model Person and src\main\resources\net\javabeat\hibernate\Phone.hbm.xml for the model class Phone. The contents of these files are as below:
Person.hbm.xml
<?xml version="1.0"?>
<!DOCTYPE hibernate-mapping PUBLIC "-//Hibernate/Hibernate Mapping DTD 3.0//EN"
"http://hibernate.sourceforge.net/hibernate-mapping-3.0.dtd">

<hibernate-mapping>
	<class name="net.javabeat.hibernate.Person" table="person">
		<id name="id" type="java.lang.Long">
			<column name="ID" />
			<generator class="native" />
		</id>

		<property name="name" type="string">
			<column name="NAME" length="10" not-null="true" unique="true" />
		</property>
		<set name="personPhoneNumbers" table="phone" cascade="all"
			inverse="true">
			<key column="PERSONID" not-null="true" />
			<one-to-many class="net.javabeat.hibernate.Phone" />
		</set>

	</class>
</hibernate-mapping>
Phone.hbm.xml
<?xml version="1.0"?>
<!DOCTYPE hibernate-mapping PUBLIC "-//Hibernate/Hibernate Mapping DTD 3.0//EN"
"http://hibernate.sourceforge.net/hibernate-mapping-3.0.dtd">

<hibernate-mapping>
	<class name="net.javabeat.hibernate.Phone" table="PHONE">
		<id name="id" type="java.lang.Long">
			<column name="ID" />
			<generator class="native" />
		</id>
		<property name="contactnumber" type="string">
			<column name="CONTACTNUMBER" />
		</property>
		<property name="phonetype" type="string">
			<column name="PHONETYPE" />
		</property>
		<many-to-one name="person" class="net.javabeat.hibernate.Person"
			not-null="true">
			<column name="PERSONID" />
		</many-to-one>

	</class>
</hibernate-mapping>
Model classes
As a next step let’s create the model classes src\main\java\net\javabeat\hibernate\Person.java and src\main\java\net\javabeat\hibernate\Phone.java. The contents of the model classes are as below
Person.java
package net.javabeat.hibernate;

import java.io.Serializable;
import java.util.HashSet;
import java.util.Set;

/**
 * Model class for Person
 */
public class Person implements Serializable {
	private Long id;
	private String name;
	private Set<Phone> personPhoneNumbers = new HashSet<Phone>();

	public Person(String name, Set<Phone> personPhoneNumbers) {
		super();
		this.name = name;
		this.personPhoneNumbers = personPhoneNumbers;
	}

	public Person() {
	}

	public Long getId() {
		return id;
	}

	public void setId(Long id) {
		this.id = id;
	}

	public String getName() {
		return name;
	}

	public void setName(String name) {
		this.name = name;
	}

	public Set<Phone> getPersonPhoneNumbers() {
		return personPhoneNumbers;
	}

	public void setPersonPhoneNumbers(Set<Phone> personPhoneNumbers) {
		this.personPhoneNumbers = personPhoneNumbers;
	}

	public void addPhone(Phone phone) {
		phone.setPerson(this);
		this.personPhoneNumbers.add(phone);
	}

}
Phone.java
package net.javabeat.hibernate;

import java.io.Serializable;

public class Phone implements Serializable {
	private Long id;
	private String contactnumber;
	private String phonetype;
	private Person person;

	public Phone() {

	}

	public Phone(String contactnumber, String phonetype) {
		super();
		this.contactnumber = contactnumber;
		this.phonetype = phonetype;

	}

	public Long getId() {
		return id;
	}

	public void setId(Long id) {
		this.id = id;
	}

	public String getContactnumber() {
		return contactnumber;
	}

	public void setContactnumber(String contactnumber) {
		this.contactnumber = contactnumber;
	}

	public String getPhonetype() {
		return phonetype;
	}

	public void setPhonetype(String phonetype) {
		this.phonetype = phonetype;
	}

	public Person getPerson() {
		return person;
	}

	public void setPerson(Person person) {
		this.person = person;
	}

}
Details of the above files are as below:
- The one-to-many association between person and phone in the following manner (added to Person.hbm.xml):
<set name="personPhoneNumbers" table="phone" cascade="all" inverse="true">
    <key column="PERSONID" not-null="true" />
    <one-to-many class="net.javabeat.hibernate.Phone" />
</set>
cascade=”all” is used to specify that all operations should be cascaded along the association.
inverse=”true” it tells Hibernate that both mappings(Person and Phone) map to the same single FK relationship. Otherwise, Hibernate will try to update both sides separately, and not in any order. So it might try to insert a child before the parent is inserted, and the database will throw an error. Hence hibernate will not issue sql statements when parent is modified. SQL statements will be issued to the DB only when the association is modified at the child end.
Corresponding code in model class (Person.java) is as follows:
private Set<Phone> personPhoneNumbers = new HashSet<Phone>();

public Set<Phone> getPersonPhoneNumbers() {
		return personPhoneNumbers;
	}

	public void setPersonPhoneNumbers(Set<Phone> personPhoneNumbers) {
		this.personPhoneNumbers = personPhoneNumbers;
	}

	public void addPhone(Phone phone) {
		phone.setPerson(this);
		this.personPhoneNumbers.add(phone);
}
- In Phone.hbm.xml file the following code is added:
<many-to-one name="person" class="net.javabeat.hibernate.Person"
	not-null="true">
	<column name="PERSONID" />
</many-to-one>
Corresponding code in Phone.java is:
private Person person; public Person getPerson() { return person; } public void setPerson(Person person) { this.person = person; } - The following addPhone() method in the Person.java, makes sure that personid field in the PHONE table is not set to null.
public void addPhone(Phone phone) {
	phone.setPerson(this);
	this.phones.add(phone);
}
4. Adding Hibernate Configuration file
As a next step let’s add the hibernate.cfg.xml to the directory:/src/main/resources . Write the new file hibernate.cfg.xml in this directory. The hibernate.cfg.xml is as follows:
<?xml version='1.0' encoding='utf-8'?>
<!DOCTYPE hibernate-configuration PUBLIC
        "-//Hibernate/Hibernate Configuration DTD 3.0//EN"
        "http://hibernate.sourceforge.net/hibernate-configuration-3.0.dtd">
<hibernate-configuration>
    <session-factory>
         <!-- Database connection settings, Connect to MYSQL -->
        <property name="dialect">org.hibernate.dialect.MySQLDialect</property>
		<property name="connection.driver_class">com.mysql.jdbc.Driver</property>
        <property name="connection.url">jdbc:mysql://localhost:3306/manisha</property>
		 <property name="connection.username">root</property>
        <property name="connection.password">root</property>

        <!-- JDBC connection pool (use the built-in) -->
        <property name="connection.pool_size">1</property>
        <property name="show_sql">true</property>
        <property name="format_sql">true</property>

        <property name="cache.provider_class">org.hibernate.cache.NoCacheProvider</property>
        <!--create the database schema on startup if required -->
        <property name="hbm2ddl.auto">create</property>
        <mapping resource="net/javabeat/hibernate/Person.hbm.xml"></mapping>
        <mapping resource="net/javabeat/hibernate/Phone.hbm.xml"></mapping>

  </session-factory>
</hibernate-configuration>
In the above file we have set the database connection to MYSQL database . The show_sql option, if set to true will display all the executed SQL queries on the console. The property hbm2ddl.auto , if set to create, creates the schema, destroying the previous data. At the end of the file we add the Person.hbm.xml and Phone.hbm.xml files to the configuration.
Note : In case you want to use any other database then, you need to change these properties – “dialect”, “connection.driver_class”, “connection.url”, “connection.username”, and “connection.password”.
5. Create Utility class
Next, we will write a utility class to take care of Hibernate start up and retrieve the session easily. We will write the file src\main\java\net\javabeat\hibernate\HibernateUtil.java as below:
package net.javabeat.hibernate;

import org.hibernate.SessionFactory;
import org.hibernate.cfg.Configuration;

public class HibernateUtil {
	private static final SessionFactory sessionFactory;
	static {
		try {
			sessionFactory = new Configuration().configure()
					.buildSessionFactory();
		} catch (Throwable ex) {
			System.err.println("Initial SessionFactory creation failed." + ex);
			throw new ExceptionInInitializerError(ex);
		}
	}

	public static SessionFactory getSessionFactory() {
		return sessionFactory;
	}
}
6. Revise the App class
Next we will revise the App.java (generated by Maven). This class tests the one-to-many relationship by creating and listing the person names and corresponding phone numbers as below:
package net.javabeat.hibernate;

import java.util.HashSet;
import java.util.Iterator;
import java.util.List;
import java.util.Set;

import org.hibernate.HibernateException;
import org.hibernate.Session;
import org.hibernate.Transaction;

/**
 * Main class
 *
 */
public class App {
	public static void main(String[] args) {
		System.out.println("Maven + Hibernate + SQL  One to Many XML Mapping ");
		Session session = HibernateUtil.getSessionFactory().openSession();
		session.beginTransaction();
		App app = new App();

		app.savePersonInfo("Manisha");

		app.listPersonInfo();

	}

	public Long savePersonInfo(String personName) {
		Session session = HibernateUtil.getSessionFactory().openSession();
		session.beginTransaction();
		Long personId = null;
		Transaction transaction = null;
		try {
			transaction = session.beginTransaction();
			Person person = new Person();
			person.setName(personName);

			Phone ph1 = new Phone();
			Phone ph2 = new Phone();
			ph1.setContactnumber("4100000");
			ph1.setPhonetype("Landline");

			ph2.setContactnumber("988000045");
			ph2.setPhonetype("Mobile");
			person.addPhone(ph1);
			person.addPhone(ph2);
			session.save(person);

			transaction.commit();
		} catch (HibernateException e) {
			transaction.rollback();
			e.printStackTrace();
		} finally {
			session.close();
		}
		return personId;
	}

	/*
	 * Lists the person's from database table
	 */
	public void listPersonInfo() {
		Session session = HibernateUtil.getSessionFactory().openSession();
		Transaction transaction = null;
		try {
			transaction = session.beginTransaction();
			@SuppressWarnings("unchecked")
			List<Person> personList = session.createQuery("FROM Person").list();

			System.out.println("List size: " + (personList).size());
			for (Iterator iterator = personList.iterator(); iterator.hasNext();) {
				Person person = (Person) iterator.next();
				Set<Phone> ph = new HashSet<Phone>();
				ph = person.getPersonPhoneNumbers();
				for (Phone p : ph) {
					System.out.println("***************************");
					System.out.println(person.getName());
					System.out.println(" Phone Type: " + p.getPhonetype());
					System.out.println(" Phone Number: " + p.getContactnumber());
					System.out.println("***************************");
				}
			}
			transaction.commit();
		} catch (HibernateException e) {
			transaction.rollback();
			e.printStackTrace();
		} finally {
			session.close();
		}
	}

}
Here the savePersonInfo() method is used to save a new Person object and Phone object to the database.
The listPersonInfo() method is used to list name of each person in PERSON table and their corresponding phone numbers and type from PHONE table. Here we use Hibernate Query Language (HQL). The query “from Person” returns a list of all the data in the PERSON table and their corresponding phone numbers from PHONE table. Note that in the HQL we only specify the java class names and not the table names. Later, using the for loop we iterate the list the data from Person and corresponding Phone table and hence display them on the console.
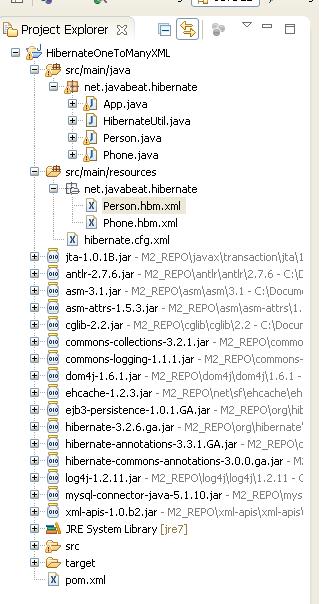
8. Final project structure
Once you have created all these source files, your project structure should look like following:
9. Execution of the above code
Now let us execute the code we created above. Let’s run the App class. Right click on App.java >Run As > Java Application. On start of each thread, a database schema will be created and the following actions will happen.
Output on the console:
Following output is displayed on the console:
Maven + Hibernate + SQL  One to Many XML Mapping
log4j:WARN No appenders could be found for logger (org.hibernate.cfg.Environment).
log4j:WARN Please initialize the log4j system properly.
Hibernate:
    insert
    into
        person
        (NAME)
    values
        (?)
Hibernate:
    insert
    into
        PHONE
        (CONTACTNUMBER, PHONETYPE, PERSONID)
    values
        (?, ?, ?)
Hibernate:
    insert
    into
        PHONE
        (CONTACTNUMBER, PHONETYPE, PERSONID)
    values
        (?, ?, ?)
Hibernate:
    select
        person0_.ID as ID0_,
        person0_.NAME as NAME0_
    from
        person person0_
List size: 1
Hibernate:
    select
        personphon0_.PERSONID as PERSONID1_,
        personphon0_.ID as ID1_,
        personphon0_.ID as ID1_0_,
        personphon0_.CONTACTNUMBER as CONTACTN2_1_0_,
        personphon0_.PHONETYPE as PHONETYPE1_0_,
        personphon0_.PERSONID as PERSONID1_0_
    from
        PHONE personphon0_
    where
        personphon0_.PERSONID=?
***************************
Manisha
 Phone Type: Landline
 Phone Number: 4100000
***************************
***************************
Manisha
 Phone Type: Mobile
 Phone Number: 988000045
***************************
Using a Common Join Table
This technique uses a join table to store the associations between Person and Phone entities. We use many-to-many element to create the one-to-many relationship between the Person and Phone entities. Since a Person can have any number of phone numbers we use a collection to hold the values. In this case we use Set. Many-to-many element is usually used to create many-to-many relationship, here we place the unique constraint on the PHONE_ID column, this makes the relationship one-to-many.
<set name="personPhoneNumbers" table="PHONE" cascade="all">
<key column="PERSON_ID" />
<many-to-many column="PHONE_ID" unique="true" class="net.javabeat.hibernate.Phone" />
</set>
Summary
- [download id=”13″]
In this post we demonstrated one-to-many relation using hibernate mapping files. We discussed about various techniques of one-to-many associations. We initially created a Java project using Maven, made it compatible with eclipse. Then we created hibernate mapping files and created the corresponding model classes (foreign key association). We then set the values in our main class(App.java), which in turn added the values to respective tables. We also listed the data from the tables. In the next post we shall see an example of Hibernate One-to-Many mapping(using Annotations).If you have any questions, please post it in the comments section. If you are interested in receiving the future articles on Java topics, please subscribe here
 How to get current username in Spring Security?