
1. Introduction to JSP Custom Tag
A custom tag is a user define JSP element. It is very useful in JSP programming for the programmers to write their own custom components for their projects. These custom tags can be re-used in many places without modification of code. In the latest trend of web development, very few developers write their own custom tags, the reason is that many web frameworks like Struts, Spring, etc. provide more advanced custom tags pre-built with their framework. To understand the custom tag and how it works is very important for a programmer.
If you want to write a custom tag, create one Java class for tag handler, one tag lib descriptor which defines the list of tags and JSP for using the custom tags. It is that much simple to get started writing a simple custom tag.
This tutorial would help you to start writing your first custom tag for JSP pages.
2. Create a Java EE Project
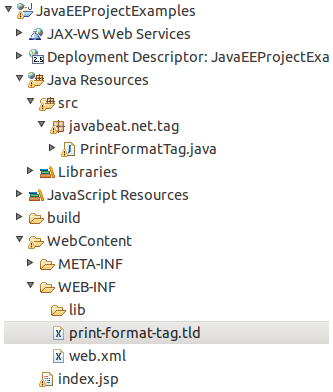
As a first step, create a Java EE project and create the necessary files for this example. Lets look below for the sample project structure.
3. Create a Tag Handler
A Tag handler has to implement Tag interface or IterationTag interface orBodyTag interface or it can also extend TagSupport class or BodyTagSupport class. IN our example we are extending TagSupport. All the necessary classes required for writing a JSP custom tag is present under the package javax.servlet.jsp.tagext.
Lets look at the below example which takes the parameter of heading element from the JSP and then formats the output. We can do any advanced operations using this custom tag.
package javabeat.net.tag;

import java.io.IOException;

import javax.servlet.jsp.JspException;
import javax.servlet.jsp.JspWriter;
import javax.servlet.jsp.tagext.TagSupport;

public class PrintFormatTag extends TagSupport {
    private String input;
    private String heading;
    @Override
    public int doStartTag() throws JspException {

        try {
            //Get the writer object for printing.
            JspWriter out = pageContext.getOut();
            //Output the format to JSP.
            out.println("<"+heading+">Formated OutPut : "+input+"</"+heading+">");

        } catch (IOException e) {
            e.printStackTrace();
        }
        return SKIP_BODY;
    }

	public String getInput() {
		return input;
	}

	public void setInput(String input) {
		this.input = input;
	}

	public String getHeading() {
		return heading;
	}

	public void setHeading(String heading) {
		this.heading = heading;
	}

}
4. Create Tag Lib Descriptor (TLD)
TLD file describes the details about the tag. This is the one file contains list of tag implementations. Here one file means it is one tag library. You can logically categorize multiple libraries and create more than one tag libraries.
<?xml version="1.0" encoding="UTF-8"?>
<taglib>
<tlibversion>1.0</tlibversion>
<jspversion>1.1</jspversion>
<shortname>Print Format Tag</shortname>
<info>Print Format Tag</info>
<uri>https://javabeat.net/jsp/taglib/print</uri>
<tag>
    <name>PrintFormat</name>
    <tagclass>javabeat.net.tag.PrintFormatTag</tagclass>
    <info>Substring function.</info>
    <attribute>
      <name>input</name>
      <required>true</required>
  </attribute>
    <attribute>
      <name>heading</name>
      <required>true</required>
  </attribute>
</tag>
</taglib>
5. Use Custom Tag in a JSP
Once you have created your tag library, you have to invoke that from your JSP file. To access the tag, first you have to declare the taglib and give the correct URI for that tag. Then you can use that from anywhere in your JSP file.
<%@taglib prefix="taglib" uri="/WEB-INF/print-format-tag.tld"%>
<html>
<head>
    <title>JSP Custom Tag Library Example: Format The Display</title>
</head>
<body>
    <taglib:PrintFormat input="Hello World Custom Tag!!" heading="h2" />
</body>
</html>
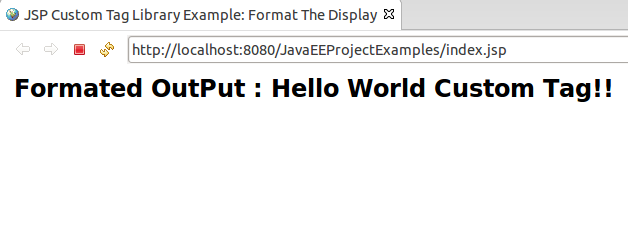
If you run the above example, you would get the output as:
 FreeMarker Template Hello World Example